The NanoCube
- Aditya Gopalan
- Dec 12, 2018
- 4 min read
Updated: Dec 16, 2018
The NanoCube is a smart lighting product that takes the Nano leaves that you've seen on the walls and adds it to a desktop size that fits in a 6x6x6 cube. This advanced technology senses the environment it is in and adapts t lighting conditions to display the relevant information in which it has been programmed.
The Concept:
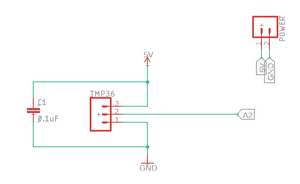
The Concept is based on the fact that the LED cube will adapt to its surroundings by adjusting to ambient temperatures, light intensities, and human presence. A motion detector will recognize if a person is in the room or the surrounding area to turn on or off (in addition to a physical button). A photo resistor will be used to detect the surrounding brightness in the room or the environment and set the cube's own brightness accordingly. Lastly, a temperature sensor will change the cube's hue to mimic the room's temperature via color.
Design Goals and Execution:
The way that this project and product was created was through a series of loops that allowed the cube to function. The sensors integrated allowed the cube to change its colors according to the environment and allowed the user to get a good idea of what is going on. The way that this cube worked was through the use of a PIR motion detector, a temperature sensor, a photo-resistor and a button. The motion sensor allowed the box to detect if anything was in the room and turn on and off to save energy. If no motion is detected in a 7 meter cone in front of the box, the LED's inside the box will shut off to save power. If any motion is detected however, the box will light up and move forward through the loop.
It will then try to detect the temperature in the room and change the color of the bottom half of the box to depict the overall temperature. The current calibration allowed the lights to show that the temperature is <68 degrees if the lights are blue, between 69 and 72 degrees if purple and 73+ if the lights are red. This allows the use to see what the approximate temperature in the room with a quick glance at the box. The top half of the boxes colors was a randomization of colors that changed colors every 5 seconds through the loop.
Once the temperature was sensed, the ambient light was detected in the surrounding environment and allowed the box to change its brightness according to the ambient room light. The brighter the surrounding room was, the brighter the LED's int he box would light up, and vice versa.
If the user decided to not have the box on without unplugging the box itself, there was a button at the back of the box to turn itself off to ensure that the box wouldn't accidentally turn on in case of accidental movement in the middle of the night.

These sensors were used in parallel to allow the box to complete all the tasks at once and update itself in real time. We had put the loop that allowed all the sensors to read the environment every 5 seconds and made the necessary changes to the box's output in that cycle.


Challenges:
We faced a good amount of challenges throughout this project. One of the biggest being that we ordered a PCB to allow all the sensors to be soldered onto, however, the PCB didn't arrive in time for the due date of our project so we had to use a breadboard to make our sensors work as we wanted and intended. We had designed a PCB that was able to incorporate all of our sensors to the board itself so that it would fit neatly into the box and make it a much more appealing and finished design. However we had to make do with a breadboard with all of our sensors. The downside of using the breadboard was that there were many exposed wires that were all a mess in the box.
One of the other big challenges that we had faced during the creating of our project was the LED libraries and functions that we needed to use to allow the box to work all together. One of the biggest challenged with the LED library was the issue that many f the libraries that we had used would not allow the LED to even work as many of the functions that were supposed to call the LED itself did not exist. So we had to figure out how to write and compile a function that the FastLED library could refer to, to allow the LED's to light up in the way that we had in mind.
Below are the images of our PCB design and a snippet of the final code that we used for our project:


What We Would Change:
For future things that we feel, as a group that we could change is that we feel that we could possibly add more customization in the colors of the box rather than the temperature on the bottom and the randomization of colors on top. We wanted to make it as customization as possible but the short tie frame we had prevented us from currently doing that. Our next improvement would most likely include such a feature. We also wanted to include a PCB so we can get it in even a smaller package than this once, since this one was bigger used to house the breadboard.
Conclusion:
As a group, we learned a lot of things from how circuits work in general to how to make everything we learned come together for a bigger project. We faced a lot of challenges throughout the project but we felt that we got to learn a lot more because of the mistakes and hardships that we had than just making a mediocre assignment or lab. We got to apply all of our knowledge and work together as a team to make something big and achieve something that we thought we couldn't in just one semester class and that is something that we all enjoyed. It was fun working with my group and I enjoyed taking this class. I feel it makes me a better student and makes me more excited of what could come in the future for this major and industry.

Comments